5
May
How to make crispy chicken spring rolls at home
Introduction to Chicken Spring Rolls
Chicken spring rolls are a popular and beloved snack that has found its place in various cuisines around the world, especially Chinese and other Asian cuisines. These rolls are made by wrapping a thin sheet of dough with a delicious filling of chicken and vegetables, rolling them up and frying them until golden brown. Chicken spring rolls are not only delicious but also light and quick to prepare snacks. They are a great choice for serving at iftar, parties or with tea. Their crunchy texture and tangy taste make them a favorite among kids and adults alike.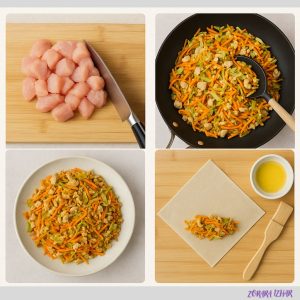 For the Filling
-
1 lb. (450g) ground chicken (or finely chopped)
-
2 tbsp vegetable oil
-
1 cup shredded carrots
-
1 cup finely chopped cabbage
-
½ cup thinly sliced green onions
-
2 cloves garlic, minced
-
1 tsp grated ginger
-
2 tbsp soy sauce
-
1 tbsp oyster sauce (optional for added depth)
-
1 tsp sesame oil
-
Salt and pepper to taste
For Wrapping and Frying
-
20 spring roll wrappers (available in most Asian supermarkets)
-
1 egg, beaten (for sealing)
-
Vegetable oil for deep frying
Equipment Checklist
You won’t need any fancy tools—just a few kitchen basics:
-
Large skillet or wok
-
Mixing bowls
-
Tongs or slotted spoon
-
Paper towels
-
Frying pan or deep fryer
-
Kitchen thermometer (optional but helpful)
Step-by-Step Preparation Guide
Step 1: Prepping the Chicken Chicken is the most important filling ingredient in chicken spring rolls, so it is important to pay special attention to its preparation so that the taste and texture are the best. Chicken used: You can use boneless chicken breast or chicken thigh. Breast meat is light and dry, while thigh meat is soft and juicy. Step-by-step preparation: 1. Boil the chicken (if using raw chicken):- Boil the chicken in clean water with salt, a little black pepper, and garlic cloves over medium heat for 15–20 minutes.
- After boiling, drain the water and let the chicken cool.
- Now shred it into fine fibrous pieces with your hands or a fork or finely chop it with a knife.
- Shred or shred cooked chicken (such as baked or roasted) into thin strips or shreds.
- This saves time and also deepens the flavor.
- Don't keep the chicken too moist, otherwise the filling will become soggy and make the roll soft.
- If desired, you can also add mild chili or a little Chicken 65 spice to the chicken to make it spicy.
- Shredded or shredded boiled chicken – 1 cup
- Cabbage – 1 cup (finely chopped)
- Carrot – 1 no. (shredded or finely chopped)
- Green onions – 2 no. (finely chopped, optional)
- Garlic – 2 cloves (finely chopped)
- Soy sauce – 2 tbsp
- Chili sauce – 1 tbsp (optional)
- Black pepper – ½ tsp
- Salt – to taste
- Oil – 1 to 2 tbsp
- Add 1–2 tbsp of oil to a frying pan or wok and heat over medium heat.
- Add finely chopped garlic to the hot oil and fry until fragrant (about 30 seconds).
- Add carrots and cabbage. Fry for 2–3 minutes so that the vegetables become slightly soft but still have a crunch.
- Now add the prepared chicken and mix everything well.
- Add soy sauce, chili sauce (if desired), black pepper and salt. Cook all the ingredients well for 2–3 minutes so that the flavors blend together.
- Turn off the heat, if you want to add green onions, add them now.
- Let the filling cool completely so that the roll does not become soft when rolling.
- The filling should be dry, if there is too much water or sauce, the roll may be soggy.
- Spices can be increased or decreased according to your taste.
- If desired, you can also add a little boiled noodles or bean sprouts.
- The roll sheet may be soft or soggy
- The roll is at risk of opening or bursting
- Excess moisture prevents the roll from being crunchy
- As soon as the filling is ready, spread it out on a large plate or platter to quickly dissipate the heat.
- Leave the filling uncovered for about 10–15 minutes to allow the steam to escape.
- The filling should feel completely dry and cool before rolling.
- If there is any moisture or steam in the filling, press it lightly with a kitchen towel to absorb the moisture.
- Remove the wrappers from the freezer 1–2 hours before using them and let them come to room temperature to soften naturally.
- Place a damp (not wet but not dripping) cloth on top to prevent the wrappers from drying out.
- Cover the rest of the wrappers with a damp cloth when you remove them.
- Fresh wrappers are usually very soft and pliable, but they also need to be protected from dry air.
- Remove individual sheets slowly before use so they don't tear.
- To seal the wrappers, you will need a beaten egg or a water brush.
- Beat the egg in a small bowl and use a brush or your finger to seal the edges.
- Remove one wrapper at a time so the rest don't dry out.
- If a wrapper cracks slightly, it can be sealed with an egg or flour paste.
- Don't leave the wrappers open for too long or they may become hard.
- Always roll tightly but gently; if it's too loose, it may open while frying.
- Keep the filling balanced; not too much and not too little.
- Make rolls of the same shape and size so that they cook evenly when fried.
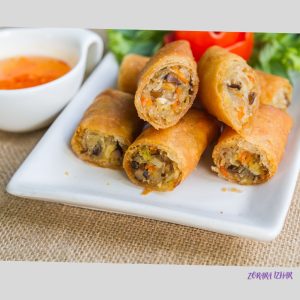
- Prepared chicken spring rolls
- Oil (vegetable, canola or sunflower) as needed
- Deep frying pan or deep fryer
- Paper towels or napkins – to absorb oil
- Add enough oil to a deep frying pan to completely submerge the rolls.
- Heat the oil over medium heat until it reaches around 170–180°C (or until you can feel a slight steam when you hold it close to your hand).
- Add 3–4 rolls at a time so that the oil temperature does not drop and the rolls fry evenly.
- Fry the rolls for 3–5 minutes, until they are golden brown and crispy on all sides.
- Drain the finished rolls on a paper towel to absorb excess oil.
- If the rolls are browning too much, reduce the heat a little.
- Do not move the rolls too much, otherwise they may open.
- If you want to fry the rolls later, fry the frozen rolls **without defrosting** them.
- Air fryer: Brush the rolls lightly with oil and air fry at 180°C for 12–15 minutes.
- Oven baking:** Brush the rolls with oil and bake in a preheated oven at 200°C for 20 minutes (don't forget to turn them halfway through).
 Expert Tips for Perfect Spring Rolls Every Time
1. Cool the filling completely
- Warm filling can cause the wrappers to soften and burst. The filling should always be dry and at room temperature.
- The wrappers dry out quickly and can burst. Cover the remaining wrappers with a damp cloth while making the rolls.
- When closing the rolls, apply a beaten egg or a thin paste of flour to the edges so that the rolls don't open during cooking.
- Add a few rolls at a time to maintain the oil temperature and fry them evenly.
- Pre-cook the rolls and store them in the freezer. Fry them straight away without defrosting when needed.
- Brush lightly with oil before baking in the air fryer or oven to give them a crispy texture.
- Beautifully cut rolls, appropriate sauces and neat plating give your food a professional touch.
- First try a few rolls, then you’ll get the hang of rolling and frying.
Dipping Sauces to Elevate Flavor
Pair your rolls with these delicious sauces:
-
Sweet chili sauce
-
Soy-garlic dip
-
Spicy peanut sauce
-
Hoisin sauce with lime
Storage and Reheating Tips
1. Short-Term Storage – 1-2 days- Store cooked rolls in an airtight container in the refrigerator.
- Wrappers can be soft, so brushing with a light oil before reheating may be helpful.
- Form rolls and place on a baking sheet (so they don’t stick together)
- Freeze for 2–3 hours
- Then put in a zip lock bag and refreeze
- Cool rolls completely
- Wrap in paper towel and store in a zip lock bag
- Finish within 2 months of use
- Heat rolls in oven or air fryer at 180°C for 8–10 minutes
- Brush lightly with oil to restore crispy texture
- Heat the rolls over medium heat with a little oil
- Flip and crisp both sides
- Heat for 30–60 seconds only if in a hurry
- But this may soften the rolls, reducing the crispiness
- Do not refreeze rolls once thawed
- Reheating will ruin the flavor and texture
- Always check that the inside is fully heated
Common Mistakes to Avoid
-
Using wet wrappers—always pat dry.
-
Skipping the cooling step.
-
Frying at low temperature—leads to greasy rolls.
-
Overcrowding the frying pan.
Variations to Try
-
Spicy Chicken: Add chili flakes or sriracha.
-
Cheesy Chicken: Add shredded cheese with the filling.
-
Herbed Rolls: Mix in cilantro or mint for freshness.
-
Baked Rolls: Brush with oil and bake at 400°F (200°C) for 20 minutes.
Healthier Alternatives
Want a lighter version?
-
Use rice paper wrappers and skip frying—serve fresh.
-
Air fry instead of deep-frying.
-
Add more vegetables like bell peppers or mushrooms.
-
Use lean ground chicken or turkey.
Chicken Spring Rolls Around the World
United States: Chicken spring rolls are often served in a fusion style, with cheese, corn, or BBQ sauce. Pakistan: They are especially popular during Ramadan and iftar. The chicken is often served with capsicum, carrots, and spicy spices. India: Spicy chicken, prepared with green chillies and chaat masala, often served with green chutney or tamarind. Malaysia: Chicken rolls are often served with sate spices, which gives them a unique flavor. Indonesia: Known as "Risoles", these rolls are breaded and fried, with a creamy chicken filling inside. South Korea: Chicken spring rolls are seasoned with gochujang (Korean red chili paste), and are often served with pickles. Singapore: The rolls here are a mix of Chinese and Malay flavors, often with mildly sweet or spicy chicken. China: Often served during Chinese New Year. Thailand: Flavored with Thai basil and fish sauceNutritional Information
| Nutrient | Amount |
|---|---|
| Calories | 140 |
| Protein | 9g |
| Fat | 6g |
| Carbohydrates | 13g |
| Fiber | 1g |
| Sodium | 310mg |
(FAQs)
1. Can I make spring rolls in advance?
Yes, you can assemble them a day ahead and store them covered in the fridge. Fry just before serving.
2. Can I bake instead of frying?
Absolutely! Bake at 400°F (200°C) for about 20-25 minutes, turning once.
3. What can I substitute for oyster sauce?
You can use hoisin sauce or an extra splash of soy sauce.
4. Can I freeze chicken spring rolls?
Yes. Freeze uncooked rolls on a baking sheet, then transfer to a zip lock bag.
5. What’s the best oil for frying?
Neutral oils like canola, vegetable, or peanut oil are ideal.
6. Are chicken spring rolls gluten-free?
Only if you use gluten-free wrappers and tamari instead of soy sauce.
Conclusion
Chicken spring rolls are a crowd-pleaser that’s easier to make than you might think. With the right ingredients, simple techniques, and a few tips from the pros, you can enjoy crispy, golden spring rolls at home any time. Whether you fry, bake, or go fresh with rice paper, they’re sure to be a hit at your table.
Share this post
RELATED
Posts
Cooking Spaghetti Squash Made Easy
How to make the green Mexican sauce?